This recipe was created by Monica Brown, by combining 3 different recipes and has a touch of honey which gives it a unique sweetness. Recipe makes 2 loafs of bread
Wet ingredients:
2 cups shredded and drained raw zucchini
2 eggs
1 cup vegetable oil
¼ cup honey
2 tsp vanilla
Dry ingredients
1 ½ cups white sugar
3 cups flour
2 tsp baking powder
2 tsp baking soda
1 tsp salt
1.5 to 2 tsp cinnamon (depending on liking)
1 cup chopped walnuts (optional)
Preparation:
Shred about 4 small to medium sized zucchini and drain well. Mix wet ingredients in large mixing bowl and then add sugar. Measure out rest of the dry ingredients in a separate bowl and slowly add to wet mixture. Mix until combined, be sure not to over mix. Mixture will be fairly thick.
Preheat oven to 325, grease and flour 2, 9” X 5” loaf pans. Pour mixture as evenly as possible into pans. Bake for 50 – 70 minutes, or until wooden pick comes out clean. Cool bread in pans for 10 minutes and then jiggle to loosen bread and remove to cool on wire rack for 30 minutes prior to wrapping in aluminum foil.
Bees pollinate a third of our food supply — they don’t just make honey! — but colonies have been disappearing at alarming rates in many parts of the world due to the accumulated effects of parasitic mites, viral and bacterial diseases, and exposure to pesticides and herbicides. Marla Spivak, University of Minnesota professor of entomology and 2010 MacArthur Fellow, tries as much as possible to think like bees in her work to protect them. They’re “highly social and complex” creatures, she says, which fuels her interest and her research.
Spivak has developed a strain of bees, the Minnesota Hygienic line, that can detect when pupae are infected and kick them out of the nest, saving the rest of the hive. Now, Spivak is studying how bees collect propolis, or tree resins, in their hives to keep out dirt and microbes. She is also analyzing how flowers’ decline due to herbicides, pesticides and crop monoculture affect bees’ numbers and diversity. Spivak has been stung by thousands of bees in the course of her work.
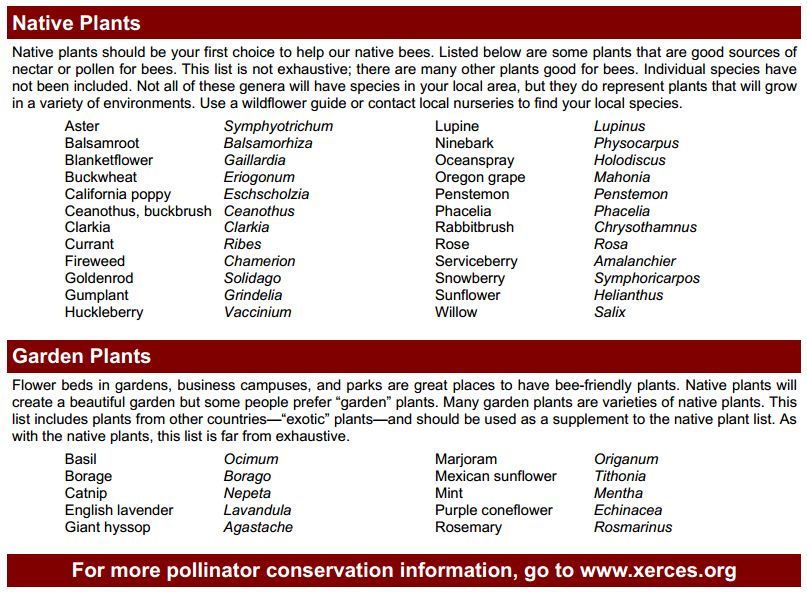
View PDF’s that have lists of local native plants that are friendly for honey bees
Admin building rain gardens, expect to see hundreds of blooms next spring. Photo by Monica Brown
By Monica Brown, Tulalip News writer
TULALIP, Wash. – The rain gardens at the Tulalip administration building have had a year to flourish, and flourish they have. When you drive through the parking lot you see trees in the garden strips along with some shrubs, but towards the back you can see a spray of green areas that are roped off. Some people are not aware that these roped off garden areas are not weeds, but are native vegetation and they were chosen specifically for their ability to remove pollutants.
“It’s a menagerie, but that’s how it was designed, to be low growing and provide a green landscape that would help filter out the pollutants,” said Derek Marks of Tulalip Natural Resources.
Last year, the Natural Resources department was able to take a few garden areas within the admin building parking lot and turn them into rain gardens. Shortly after it was completed it had been sprayed with herbicides, a major no-no when it comes to rain gardens. “You don’t build a rain garden to manage it with herbicides,” said Derek. “The rain garden themselves filter the pollutants; we’re not supposed to add pollutants to them.”
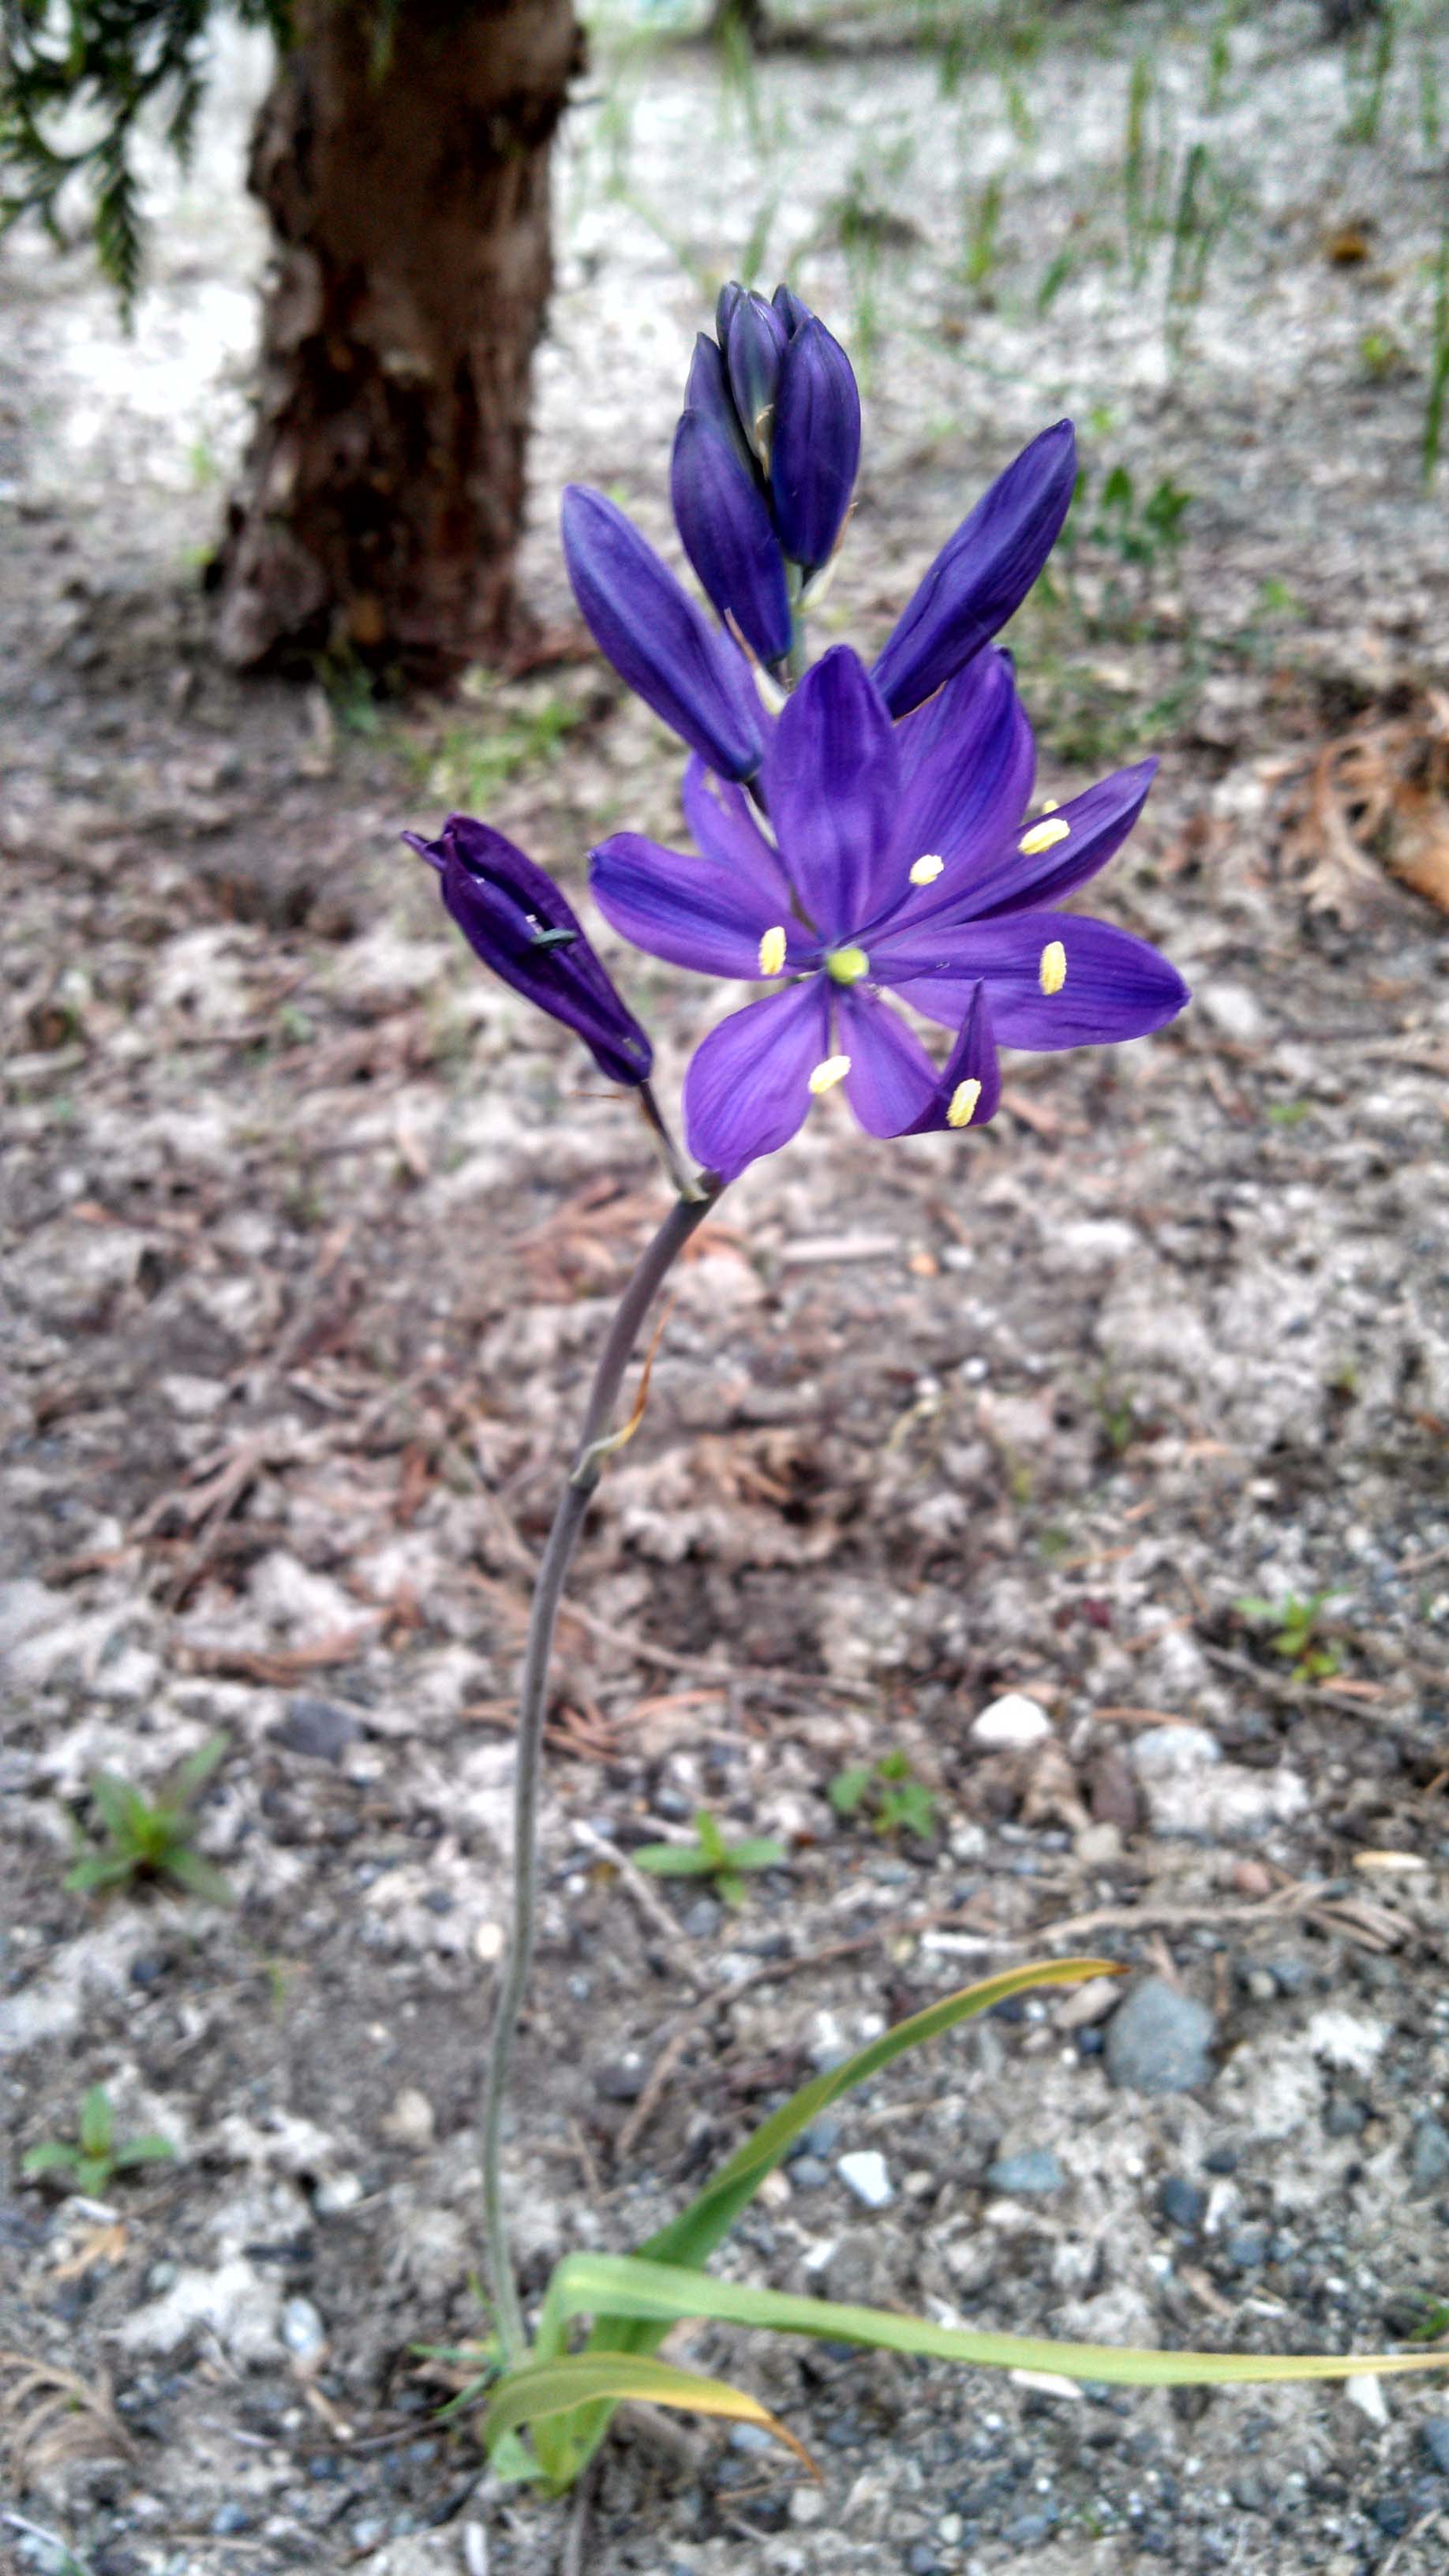
The gardens contain mainly different species of sedge, rush, woodrush and grass along with western buttercup, great camas and chocolate Lily. This last spring there weren’t many blooming camas or chocolate lily because the time between when they were planted and when they bloom in spring was too short for them to become established.
Chocolate lily Photo By Derek Marks
“We’re expecting a lot more to bloom next spring. You’ll probably see several hundred camas plants out here blooming,” commented Derek, about the shortage of blooms this last spring.
Derek explains that, “the rain gardens are filter strips.” And, “the plants and microbes work hand in hand to break down the pollutants.” They remove toxins, oils and heavy metals that are in water runoff from the parking lot. Without the rain garden the pollutants in the water runoff would make their way out and contaminate the Puget Sound. The possibility of turning other garden strips within the parking area into more rain gardens has come up, but nothing has been decided on as of yet.
This pilot rain garden project was developed by Tulalip’s Natural Resources’, Valerie Streeter and Derek Marks. They caution that although some of these plants are known for being harvestable, these particular plants, and any that may reside in other rain gardens, are not harvestable because they are full of toxins.
Camas bloom Photo by Derek Marks
For those that would like to start their own rain garden, Washington State University and Stewardship Partners have begun a campaign to install 12,000 rain gardens in the Puget Sound area by the year 2016. The website for the campaign has videos to explain the whole process of putting in a rain garden and lists the many resources available to someone interested in installing one. Please visit 12000raingardens.org for more information about rain garden installation.
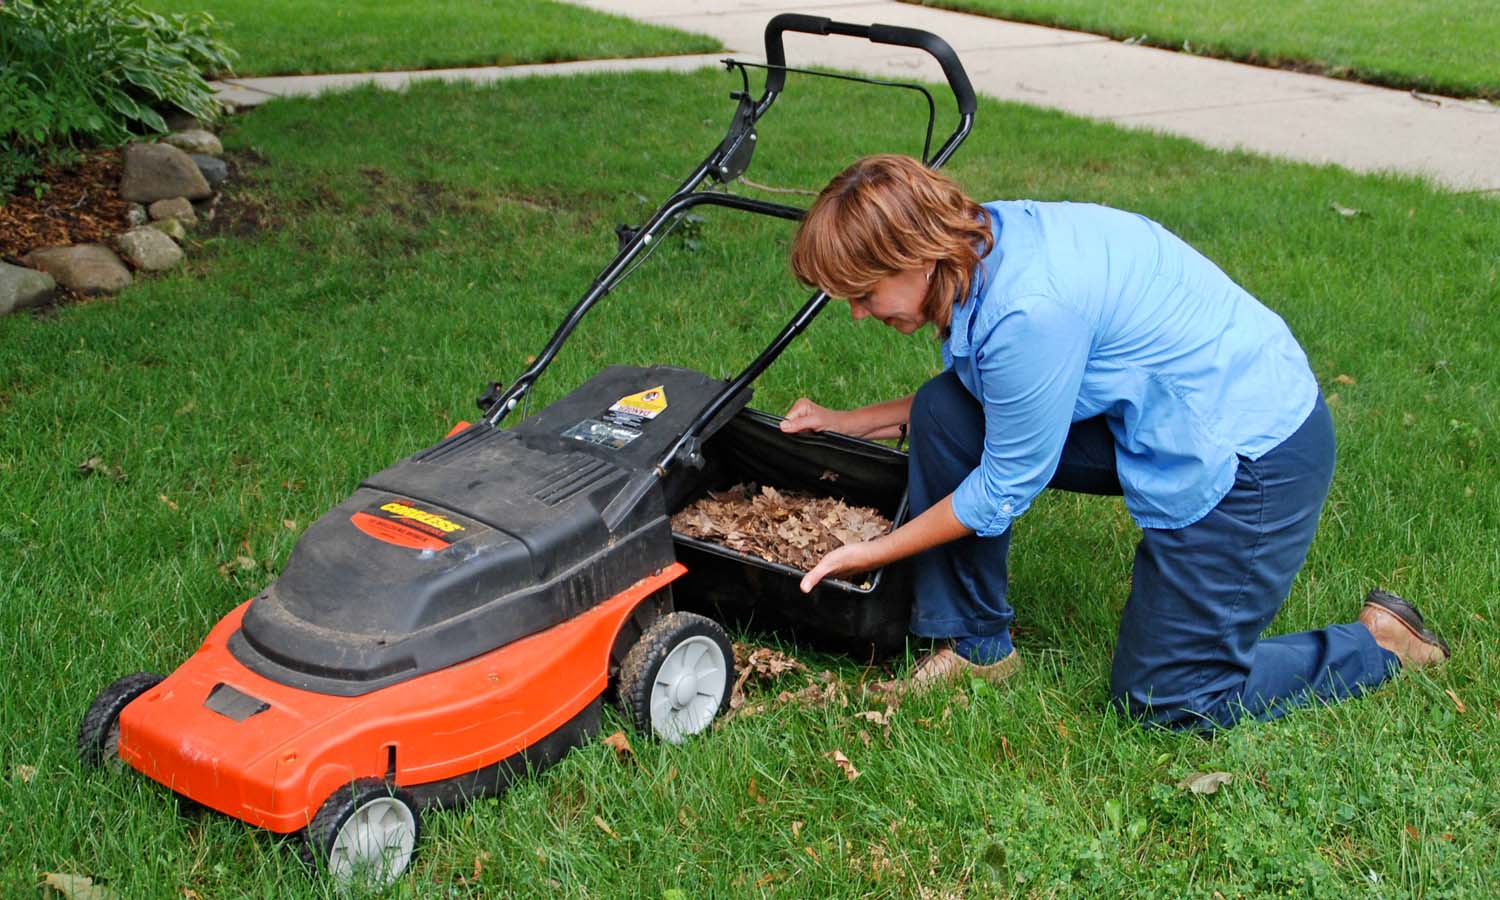
Shredding fall leaves with a mower and spreading a layer over the soil in the garden will conserve moisture and insulate the roots of perennial plants. Photo/Melinda Myers, LLC
By gardening expert Melinda Myers
Don’t let a busy schedule stop you from creating a beautiful landscape. Incorporate a few of these changes in your fall landscape care. You’ll create beautiful results with a limited investment of time and effort.
Cut the grass, recycle fall leaves, and improve the soil with a pass of the lawn mower. Shred leaves and leave them on the lawn as you mow this fall. As long as you can see the grass through the leaf pieces, the lawn will be fine. As the leaves break down they add organic matter to the soil, improving drainage in clay soil and water holding ability in sandy soils.
Or, as an alternative, use excess leaves as a soil mulch. Shred the leaves with your mower and spread a layer over the soil to conserve moisture and insulate the roots of perennials. Fall mulching gives you a jump on next spring’s landscape chores.
Improve your lawn’s health by fertilizing this fall with a low nitrogen slow release fertilizer, like Milorganite. You’ll reduce the risk of disease problems and with slower weed growth in fall, your lawn, not the weeds, will benefit from the nutrients. Fall fertilization also helps lawns recover from the stresses of summer by encouraging deep roots and denser growth that can better compete with weeds and tolerate disease and insects.
Northern gardeners can follow the holiday schedule and fertilize Labor Day and Halloween. Southern gardeners should make their last fall fertilization at least 30 days before the lawn goes dormant or the average first killing frost to avoid winter kill.
Do a bit of planting. Cool season annuals brighten up the fall garden and, for those in warmer regions, the winter garden. Consider adding cold hardy pansies. They provide color in the fall garden, survive most winters, and are back blooming in the spring just as the snow melts.
Fall is also a good time to plant perennials, trees and shrubs. The soil is warm and the air cooler, so the plants are less stressed and establish more quickly. Select plants suited to the growing conditions and be sure to give them plenty of room to reach their mature size.
Plant daffodils, tulips, hyacinths and other bulbs in fall for extra color next spring. Set the bulbs at a depth of two to three times their height deep. Then cover them with soil and sprinkle on a low nitrogen slow release fertilizer. This type of fertilizer promotes rooting without stimulating fall growth subject to winter kill.
Base your bulb planting time on the weather not the calendar. Start planting after the night-time temperatures hover between 40 and 50 degrees. Be patient, waiting until the soil cools reduces the risk of early sprouting that often occurs during a warm fall.
Those gardening in the far south and along the gulf coast can purchase pre-cooled bulbs to compensate for the warm winters. Or the chilling can be done at home by storing the bulbs in a 35 to 45 degree location for at least 14 weeks before planting.
Leave healthy perennials stand for winter. This increases hardiness and adds beauty to the winter landscape with their seed heads, dried foliage and the birds they attract. Plus, it will delay cleanup until spring when gardeners are anxious to get outdoors and start gardening.
However, be sure to remove any diseased or insect-infested plants to reduce the source of pest problems in next year’s garden.
Start composting or add shredded leaves and other plant debris to an existing compost pile. Combine fall leaves with other plant waste, a bit of soil or compost, and sprinkle with fertilizer to create compost. Recycling yard waste saves time bagging, hauling and disposing of green debris. You also reduce or eliminate the need to buy soil amendments to improve your existing garden soil.
Incorporate one or all six of these practices to increase the health and beauty of your landscape now and for years to come.
Gardening expert, TV/radio host, author & columnist Melinda Myers has more than 30 years of horticulture experience and has written over 20 gardening books, including Can’t Miss Small Space Gardening. She hosts the nationally syndicated Melinda’s Garden Moment segments and is a columnist and contributing editor for Birds & Blooms magazine. Myers’ web site, www.melindamyers.com, offers gardening videos and tips.
Springfield, Mo. – Crops grown like those sown by Native Americans 1,000 years ago are growing again at Smallin Civil War Cave just south of Springfield.
Staff archeologist Eric Fuller planted corn, sunflowers, squash and other plants from seeds that have not been manipulated since they were originally grown by the Osage tribes and others that inhabited the area.
The gardens are part of the cave’s mission to educate people about the natural wonders of the Missouri Ozarks and its fascinating Native American history. Not only will they help people better understand where foods came from and how they have changed over the years, patrons also will learn about the diet of the people who were here when Europeans arrived in the Americas, Fuller said.
The gardens will be a focal point of a new tour offered on the cave property titled “Forest of the Osage.” A hike through the forest will give people a new look at the trees and plants of the Ozarks; legends about the plants; and ways the Osage Native Americans used plants for construction, food and medicine.
Smallin Civil War Cave offers a variety of other tours and events, including tours of the cave itself; Civil War Tours in which patrons enjoy dinner around a campfire with guides dressed in Civil War-era costumes telling stories about the past; and Civil War Christmas tours featuring hot cocoa, a cave tour and holiday lights.
Cave tours teach lessons about the archeology, biology, geography, anthropology and history.
The cave is open year round and the paved cave trails are easily traversed by wheelchairs.
For more information about Smallin Civil War Cave, visit www.SmallinCave.com or call 417-551-4545. For information about other things to see and do in the Springfield area, visit www.SpringfieldAdventures.com or call the Convention & Visitors Bureau at 800-678-8767.
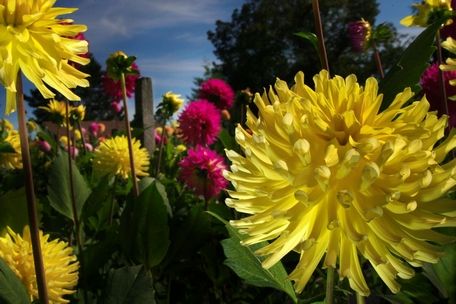
The big bursts of color light up a garden like a July 4th celebration.
And they stay lit until the first frost.
Dahlias are colossal flowers. Some are the size of pumpkins
Growers will show off their blooms at this weekend’s Snohomish County Dahlia Show in Everett. It is the club’s 104th consecutive year to have a show.
“We’ve had as many as 2,200 or 2,300 blooms,” said Hills Collins, show spokesman.
The judging is done before the doors open to the public.
“We have a head table with all the different winners,” Collins said. “The head table is judged to pick the best flower in the show. All different types are judged against each other, and one bloom is picked.”
Club members will be on hand to answer questions and talk about their blooms.
Longtime member Bernie Wilson, 68, a retired Snohomish firefighter, won the prestigious national Stanley Johnson Medal in 2012 for Lakeview Glow, an incurved cactus dahlia he originated.
The lake part is named after Blackmans Lake that is the backdrop to his 5-acre Snohomish property.
“The ‘glow’ came from if you stand up there by the house and look over the garden down it kind of glows up from all the rest of them,” he said.
His yard is aglow with about 100 varieties of dahlias.
“It’s just a fun hobby. It’s a challenge to show them. I enjoy being outside and in the garden, so it kind of comes natural,” he said.
He started growing dahlias in the 1970s after a neighbor gave him a tuber. Dahlia plants grow from tubers planted in the ground like potatoes.
From the ugly duckling roots come gorgeous blooms.
On show days, Wilson takes the best blooms he cuts to competitions and leaves the rest out for his neighbors to fill their vases. “Saturday morning they’re on the carport. And anybody who wants them can come get them,” he said.
Allison Richards also likes to spread the dahlia love around, in various forms.
“I give people at my work a bunch of tubers, and they just go nuts,” said Richards, 42, IT and general services manager at Maple Systems.
She started out growing a few dahlias and now has about 60 to 70 varieties and 200 plants.
“I threw myself into it; let’s put it that way,” she said. “I tie it in with my photography hobby. I put together a dahlia calendar for family and friends. The colors are so vibrant. There are so many different varieties and shapes and sizes.”
Dahlias are her tonic.
“I work with computers. Things break. Things don’t always go the way they should,” she said.
“I go home and go out there and there’re pretty flowers.”
See the show
The Snohomish County Dahlia Show is from 1 to 6 p.m. on Saturday and 10 a.m. to 4 p.m. Sunday, at Floral Hall at Forest Park, 802 Mukilteo Blvd., Everett.
Snohomish County Dahlia Society meetings are 7 p.m. on the second Thursday of the month at Legion Park Hall, 145 Alverson Blvd., in Everett. The club has a tuber sale in April.
Caring for dahlias
In summer:
Remove old or spent flowers.
Water deeply every four or five days during the summer heat.
As the blooms develop, fertilize with a low or no nitrogen fertilizer, such as one labeled 0-20-20, to encourage flower and tuber development.
Control for slugs, snails and other pests.
Remove two side buds at each budding tip to encourage better blooms.
Digging dahlias:
Enjoy the flowers until the first frost kills the foliage.
If you have good drainage, leave the tubers in the ground, cut off any dead foliage, and cover with 3 to 4 inches of mulch. Clumps should be divided every third year for bigger, better flowers and stronger stems.
If you choose to dig the tubers, cut off the stalks to 3 or 4 inches above the ground and leave in the ground for a week or two to allow eyes to set before digging. Begin cutting down and digging by November even if no killing frost has taken place.
Dig around each tuber clump with a shovel or garden fork and lift gently. Hose off the dirt from the tuber, clip off the feeder roots with garden scissors and let dry overnight.
Dividing and storing:
Divide clumps in half by splitting with pruning shears.
Cut off tubers using hand pruners, garden scissors and a sharp knife. Wear protective gloves. Each tuber should have an eye you can see. The tuber eyes are located at the swell of the crown near the stem.
Soak tubers in a solution of 1 cup of bleach and 3 gallons of water for 15 or 20 minutes to kill bacteria. Allow tubers to dry several days on newspaper in a cool, dark place.
Label the tubers before storing with a permanent marker or no-blot pencil. If you don’t know the name, just list the flower color.
Store cut tubers in plastic bags with a few handfuls of vermiculite, wood shavings or potting soil. Another method is rolling tubers in a long strip of plastic wrap, making sure each tuber isn’t touching the others.
Keep tubers in a dark, cool place that does not freeze. A crawl space, root cellar or old refrigerator are good locations.
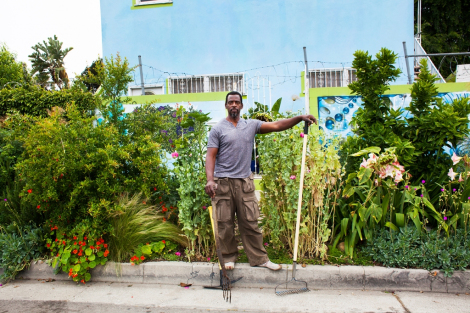
In 2010, Ron Finley planted a garden on the 150-foot-long curbside strip outside his house in South Central Los Angeles. The produce — tomatoes, kale, corn, you name it — was free for the taking, and the colorful riot of herbs and flowers and vegetables got a lot of attention. The only unwelcome scrutiny was from the city of Los Angeles, which owns the land. Finley received a citation for growing plants that exceeded height limits, and for failing to purchase a $400 permit. By circulating a petition and bending the ear of a receptive city council member, Finley convinced the city to leave his garden alone. Around the same time, he helped start an organization called L.A. Green Grounds, dedicated to installing free vegetable gardens in curbside medians, vacant lots, and other properties in blighted areas.
Then, in February of this year, the self-described “gangster gardener” — an outgoing straight-talker with a penchant for catchy one-liners — gave a TED Talk. “The drive-throughs are killing more than the drive-bys,” he said, exhorting urban dwellers to get outside and “plant some shit.” The talk instantly rocketed him to green thumb stardom. As of this writing, the talk has attracted more than 1.3 million views, and Finley has appeared on Russell Brand’s late night talk show and been profiled by the New York Times, among many others.
This fashion designer — he’s dressed the likes of Shaquille O’Neal — and collector of black entertainment memorabilia, highlighted in a recent movie poster exhibit — now spends much of his time delivering talks and planning new urban gardening ventures. All the media attention has brought new funding, including support from the Goldhirsh Foundation. (But in Los Angeles, the bureaucratic wheels grind slowly. Planting on curbside medians remains a tricky proposition.)
Finley had just returned from a permaculture workshop in Sonoma County when we spoke. We chatted about fame, sex, and his diabolical plan to take over the world.
Q. It sounds like you’ve suddenly got a lot of people wanting to talk to you.
A. Wanting to talk to me, wanting to see me, driving from Oklahoma to meet me … It’s been a little crazy. It’s pretty miraculous how the words, the ideas, have spread. It’s just amazing to me that growing your own food is so foreign to so many people.
Q. Why do you think your message has been so powerful? Is there something intangible about gardening, beyond growing your own food?
A. It’s connection, period. To me, the garden is no more than a metaphor for life. Everything you experience in life happens in the garden. You learn patience, you learn systems, you learn biology, you learn sex. And you learn the thing we call death may not actually be death. It may just be an energy transfer. That’s what composting is. If I take this dry leaf that’s supposed to be dead and crumbly and I put it with this green leaf, why does it heat up to 200 degrees sometimes? If it was dead, how did it happen? I’m not a scholar or something, I’m as common a man as they come. But to see something like that happen, it makes you look at life differently.
Q. Gardening takes sustained work. How do you keep people motivated to do all the work that comes with creating your own food?
A. Well, you show ‘em the wheelchair or the pill that they’re gonna take for the rest of their life. To me, that’s motivation enough. You keep doing it [eating badly] and this is where you’re gonna wind up. You can’t save everybody, you know. But there’s people who want to be saved, people who want to get off these drugs these doctors are prescribing.
Q. You grew up in South Central. What did you grow up eating?
A. I mean I grew up eating the garbage that was here. You know, convenience foods. Macaroni. I never liked macaroni. Frozen spinach. We had some fresh food but at the time it was when they were changing the whole food system to be “convenient” for us. I ate McDonald’s, Burger King, coming up. All that stuff. You had no idea what this food was made of and that it would make you sick and in some cases kill you.
Q. What made you start eating differently?
A. I saw the light when there was a health food store in L.A. called Aunt Tilly’s, years and years ago. It was at the Pacific Design Center and we used to go there because there were these beautiful women there. [Laughs] So I was exposed to some people around me at an early age. I didn’t know it would have the effect that it did.
Q. How did you begin to garden?
A. I mean a lot of the stuff I do goes all the way back to when I was in elementary school. I still start seeds the way I started them then. You know, in a petri dish with a wet brown paper towel. And you get to watch the sprouts from the seeds pop up. [I started the guerrilla garden because] work was slow or non-existent and I took to the garden to beautify this piece of land. It became my solace. You get addicted.
Q. Tell me about your new project.
A. I’m doing what we’re calling right now the Ron Finley Project, which is the whole containment cafe concept that’s attached to a garden with a training facility. It’s a facility where we train kids how to think, not what to think. I want people trained in everything from aquaponics to woodworking to fashion to art. We want to basically put [these facilities] in what I consider food prisons, which is what a lot of us live in … We’re just trying to show people how to grow their own food, how to take your health back into your own hands. A lot of industries don’t want us to be independent. They don’t really benefit from you growing your own food.
Q. What is your typical day like now that you’re a famous man?
A. My typical day starts with me waking up. From there, I don’t have a typical day. People ask ‘Hey, how are you?’ And I say ‘Hey, I woke up this morning.’ And that’s real to me. I get another shot at this. Sometimes I have appointments, or I’m on the phone all day. Sometimes I’m putting in gardens. I don’t want to do the same thing every day … We all should definitely have different endeavors and different interests. All that does is increase our web, make that oneness tighter. And you realize, damn, there really ain’t no difference. We all need sex and food and sex and some water and sex. You realize that that’s your basic needs. [Laughs]
Q. Any other projects in the works?
A. I’m gonna be working with Alice Waters. Me and Alice are putting together a diabolical plan to take over the world.
Combine dry ingredients in a bowl. Add warm water in small amounts and knead dough until soft but not sticky. Adjust flour or water as needed. Cover bowl and let stand about 15 minutes.
Pull off large egg-sized balls of dough and roll out into fairly thin rounds. Fry rounds in hot oil until bubbles appear on the dough, turn over and fry on the other side until golden.
Serve hot. Try brushing on honey, or making into an Indian Taco.
Buttermilk Fry Bread
Substitute buttermilk for water. Follow the same recipe.
Most of my gardening tips have been about planting, harvesting and preserving (or cooking) fruits and vegetables. This week I’d like to dedicated this column space to something a little more beautiful and delicate, something with a touch more impermanence: bouquets.
Arranging a bouquet can be as simple as gathering a bunch of flowers and sticking them in a vase or a mason jar. And guys? Stepping out into the garden and returning with a thoughtfully plucked bundle of flowers is much more romantic then coming home with a half-wilted, plastic-covered handful of flowers with a grocery store price tag. And gals? Guys like to get flowers from their sweethearts too . . . they just may not know it yet.
Beautiful, low-maintenance flowers that make awesome bouquets include hydrangeas, zinnias, dahlias, sunflowers and feverfew. There are also the classic bouquet makers: roses, daffodils, daisies and lilies. Really you can put anything into a bouquet but these flowers are great choices with a hardy vase life. Hydrangeas, roses, zinnias, feverfew and certain kinds of daisies also make great dried flower arrangements for a more permanent arrangement.
If you want to up your game and create something that really stuns, or perhaps you want to make your own bouquets for a special event like a wedding, there are a few simple tips to remember.
First, you can make beautiful bouquets with just one type of flower. Gather a bunch of zinnias or peonies, for example. Gather a lot more than you think you’ll need because you are going to really want to pack them together. Strip off all of the leaves and cut the stems so that they are lush with the jar or vase that you are going to place them in, you’ll want the outside flowers to be resting on the lip of the vase. Viola! This is also a great option for a simple, elegant and contemporary bridal bouquet. Cut the stems to your desired length and then secure them together with florist tape or several large rubber bands. Conceal the rubber bands with a wide, beautiful bow.
If mixing and matching several types of flowers it may help to do a little planning before you start cutting. Bigger flowers can be accented with smaller flowers, for example. Also think about the colors you’ll be using. Light pink zinnias would pair well with dark pink gerbera daisies. Red dahlias would pair well with other red or orange flowers. Yellow daffodils and yellow roses may not look so great together—that’s a lot of yellow and their shapes are so different that it would be hard to create any cohesiveness for the eye to follow.
Cut all of the stems for your arrangement at the same time and slightly longer than you’ll think you need them, making room for error. Cutting the stems at an angle helps the flower suck up water. The flowers at the back of your arrangement should have longer stems than the plants towards the front. And don’t forget that you can use things other than flowers in your arrangements! Ferns, leaves, a curly thin twig, and ornamental grasses all make great additions to a bouquet and help fill in space while creating visual interest.
And don’t forget your greatest resource: the Internet. A quick images search will earn you thousands of pictures for inspiration. With a little practice you may even find yourself with a new hobby or a new job as a florist!
Darla Antoine is an enrolled member of the Okanagan Indian Band in British Columbia and grew up in Eastern Washington State. For three years, she worked as a newspaper reporter in the Midwest, reporting on issues relevant to the Native and Hispanic communities, and most recently served as a producer for Native America Calling. In 2011, she moved to Costa Rica, where she currently lives with her husband and their infant son. She lives on an organic and sustainable farm in the “cloud forest”—the highlands of Costa Rica, 9,000 feet above sea level. Due to the high elevation, the conditions for farming and gardening are similar to that of the Pacific Northwest—cold and rainy for most of the year with a short growing season. Antoine has an herb garden, green house, a bee hive, cows, a goat, and two trout ponds stocked with hundreds of rainbow trout.
Darla Antoine on a recent visit to Washington State (Courtesy Darla Antoine)
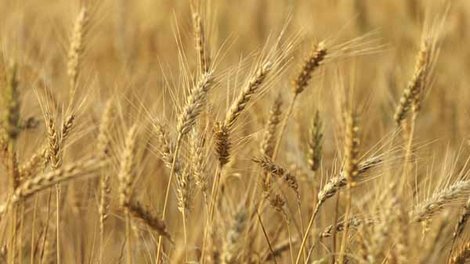
Credit: Getty Images Wheat Field
August 7, 2013
By NICHOLAS K. GERANIOS — Associated Press
PULLMAN, WASH. — A study by Washington State University has found no additional sign of the genetically modified wheat discovered at one Oregon farm this spring.
The tests involved dozens of wheat varieties developed at Washington State, the University of Idaho and Oregon State University, plus varieties from Westbred/Monsanto and Limagrain Cereal Seeds, WSU said this week.
The time-consuming study included checking more than 20,000 individual plots, Washington State University said.
“WSU undertook its own investigation as part of its commitment to serving Northwest farmers,” said James Moyer, director of WSU’s Agricultural Research Center.
The study’s collaboration with the other universities and the commercial seed companies was unprecedented, and reflected the common goal of trying to determine if the genetically modified wheat discovered in Oregon was an isolated case or if the industry had a larger problem, Moyer said.
WSU’s data clearly suggests this was an isolated case, Moyer said.
The tests involved growing seed, spraying infant plants with the herbicide glyphosate and conducting molecular testing. None of the plants showed the glyphosate resistance found in the fields of an as-yet-unnamed Oregon farmer, WSU said.
Last month, the U.S. Animal and Plant Health Inspection Service also said grain tests and interviews with several hundred farmers found no other instances of herbicide-resistant crops beyond that one Oregon farm.
The modified wheat was discovered in May when field workers at an eastern Oregon farm were clearing acres for the bare offseason and came across a patch of wheat that didn’t belong. The workers sprayed it, but the wheat wouldn’t die, so the farmer sent a sample to Oregon State University to test.
A few weeks later, Oregon State wheat scientists discovered that the wheat was genetically modified. They contacted the USDA, which ran more tests and confirmed the discovery.
Agriculture Department officials have said the modified wheat discovered in the Oregon field is the same strain as a genetically modified wheat that was designed to be herbicide-resistant and was legally tested by seed giant Monsanto a decade ago but never approved.
Most of the corn and soybeans grown in the United States are already modified, or genetically altered to include certain traits, often resistance to herbicides or pesticides. But the country’s wheat crop is not, as many wheat farmers have shown reluctance to use genetically engineered seeds since their product is usually consumed directly. Much of the corn and soybean crop is used as feed.
The USDA has said the wheat would be safe to eat if consumed. But American consumers, like many consumers in Europe and Asia, have shown an increasing interest in avoiding genetically modified foods.
The vast majority of Washington’s wheat is exported.