Gardening season at Hibulb opens with goal to donate to local food banks

By Brandi N. Montreuil, Tulalip News

TULALIP – Dust off your shovels, favorite gardening gloves and garb because it is time for some greenhouse gardening.

A working partnership between the Tulalip Tribes and the Washington State University Snohomish County Master Gardeners Foundation is making available a series of classes for interested gardeners of all levels. Classes will be held at the Tulalip Hilbulb Cultural Center and Natural History Preserve.

In addition to classes, the crops grown this year will be used to aid local food banks, such as the Tulalip Food Bank, and other Snohomish County master gardener food bank gardens.

Gardening will be done in the Hibulb Cultural Center and Natural History Preserve’s demonstration garden, ‘Gardening Together as Families’. Classes will begin with a two-part series on seedling, followed with a two-part series on transplanting.

Through a hands-on approach, participants will work together to learn the “how-to’s” of greenhouse gardening and grow organic vegetables and herbs that will focus on traditional native food and medicine plants. Participants will also learn the benefits of healthy living through gardening, and how to reduce the impact of invasive species.

Classes are open to the public and there is no fee to attend.

Greenhouse Gardening kicks off February 12, 10 a.m. – 12 p.m. Seedling class will be held Sunday, February 23, 1 -3 p.m. and again on Wednesday, February 26, 1-3 p.m. Transplanting class will be held Sunday, March 16, 1-3 p.m. and again on Wednesday, March 19, 1-3 p.m.

The WSU Extension Master Gardener Program train volunteers to be effective community educators in gardening and environmental stewardship. They also enhance communities through demonstration gardens and donation of produce to local food banks.

For more information about the classes or the ‘Gardening Together as Families’ program at the Hibulb Cultural Center, please contact Veronica Leahy at 360-716-5642 or vleahy@tulaliptribes-nsn.gov.

Brandi N. Montreuil: 360-913-5402; bmontreuil@tulaliptribes-nsn.gov

Gardening_Web

Greenhouse classes at the Hibulb Cultural Center begin Feb 12

We would like to invite you to attend our greenhouse classes at the Hibulb Cultural Center beginning this month. We are looking forward to another garden season of good food, new friendships and great memories!
 
This year we have something special to announce: We are partnering with WSU Snohomish County Master Gardeners Foundation to grow vegetables and herbs for our Tulalip garden programs, our local food bank and many other Snohomish county master gardener food bank gardens. We welcome you to come alone or bring your family to any of the greenhouse classes we provide. There is plenty of work for all gardening levels.
 
See the flyer for dates and times. For more info contact Veronica Leahy, 360.716.5642 or vleahy@tulaliptribes-nsn.gov


Gardening_Web

5 Pow Wow/Christmas- Style Treats That’ll Bring Santa Into Your Kitchen

Tsawaysia.comRachel, left, with her daughter and niece finished a longhouse gingerbread House. So can you!
Tsawaysia.com
Rachel, left, with her daughter and niece finished a longhouse gingerbread House. So can you!
Vincent Schilling, 12/21/13, Indian Country Today Media Network

Now that we are at the height of the Christmas and holiday season, all of those little Elves and Santa will surely be making their way into your kitchen to sample some of those Christmas snacks and goodies.

Not wanting to disappoint our dear readers, in this light, we are introducing a few luscious holiday treats “Native and Pow Wow Style.”

Enjoy the Native deliciousness!

1. A Gingerbread Longhouse

In the midst of the Squamish Nation (about 40 miles North of Vancouver), Alice Guss took the time to teach Rachel, her daughter, and her daughter’s friend to create an amazing Gingerbread Longhouse (pictured above). The template was created by Alice’s brother Rick.

“We’ve been doing this for a long time. We put candy on the longhouses and blinking lights to make it look like fire,” said Guss. “I just did a workshop for seven-year-olds, and they piled so much candy on the roofs [that] the roofs started to collapse!”

2. Healthy Snack Bites (Healthy? Yes, and Yummy!)

86Lemons.com
86Lemons.com

Using earthly, fun-food treasures, such as sunflower seeds, agave and cacao powder, you can have an easy and cholesterol-free snack bites to offer Santa.

He’s eaten so many cookies, he’ll probably be appreciative!

INGREDIENTS:
1 cup raw sunflower seeds
1/2 cup each: raisins, coconut and sesame seeds
2 tbsp. each raw agave nectar and cacao powder
1/4 tsp. salt
Steps – Food process Sunflower seeds and raisins until coarse, add agave and cacao powder. Roll into a golfball-sized ball, coat with coconut or sesame seeds and chill.

See 86Lemons.com.

3. Pumpkin Chocolate Chip Cookies

TwoPeasandTheirPod.com


Wait a minute, do we even need to add a description here? I was a sucker at Pumpkin chocolate! Add the word “cookie” and the show is over. Sign me up!!

The recipe’s from TwoPeasandTheirPod.com. Turns out, there is a healthy, and even healthier version. It’s a win-win, YUM!

I am preheating my oven…now.

Complete recipe, here: TwoPeasandTheirPod.com

Even healthier, cholesterol free version, here: TwoPeasandTheirPod.com

4. Chocolate Fry Bread

PhoenixNewTimes.com
PhoenixNewTimes.com

In 2011, Laura Hahnefeld of the Phoenix New Times named Chocolate Fry Bread from the Fry Bread House as one of the top 100 Favorite Dishes of 2011.

I don’t know about you, but I think Santa would come running full-speed to come get a taste of this one!

5. Nopalitos (Cactus) Salad

Last but not least, a “guilt reliever” dish.


Not wanting to “over-sweet” your Christmas or holiday season, let’s at least throw in a salad to offset some goodie calories. Not just any old salad, but a cactus salad, that’s a pretty cool indigenous-themed dish!

Nopales are the edible cactus leafs or pads that are cultivated in the mountainous areas near Mexico City. It is also known as prickly pear and, surprisingly, can be found at many specialty grocery stores such as Whole Foods Market.

Check out the full recipe, which includes Nopales, onion, tomato, cilantro, jalapeno, avocado and lime, at WhatsCookingMexico.com.


Read more at http://indiancountrytodaymedianetwork.com/2013/12/21/5-pow-wowchristmas-style-treats-thatll-bring-santa-your-kitchen-152823

Enhance Your Holiday Landscape

by Melinda Myers

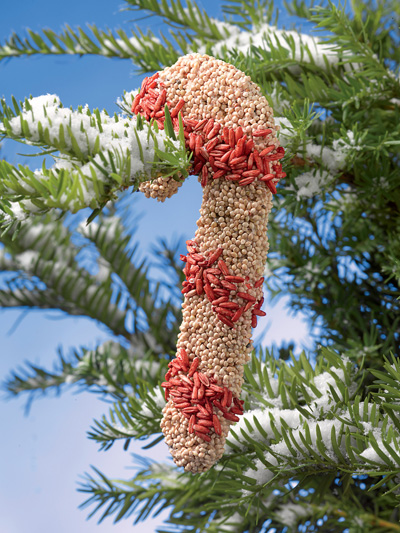
Candy cane birdseed
Candy cane birdseed

By Melinda Myers

Add a little holiday sparkle to your landscape for you and your guests to enjoy. No matter the weather outside, a few decorative touches can greatly increase the beauty and enjoyment of your winter landscape.

Try one, two or all eight of these tips to improve your landscape’s winter appeal.

Add some solar powered accents. Light a pathway, your favorite tree or front porch without installing additional outlets. Look for unique colors and shapes like the solar star lantern or the changing colors of northern lights spheres (gardeners.com) for added appeal. The wide variety now available can help create a memorable winter display. Be sure to select solar accents that provide hours of enjoyment when fully charged.

Create an outdoor holiday tree for you and your feathered visitors to enjoy. Decorate a few of your evergreen trees and shrubs with purchased or homemade birdseed ornaments. Holiday shapes made of energy rich birdseed and suet give the trees a holiday flare, while providing important food for birds to enjoy. These also make great gifts for your favorite gardener or bird watcher.

Light up your winter containers. Fill a weather-proof planter with potting mix or play sand.  Purchase greens from your favorite garden center or trim a few from your landscape. Stick the cut end of the greens in the potting mix or sand to create an attractive display. Add some colorful berries, decorative twigs and ribbon. Then add some height and light to your winter container with fiber optic solar lights. Place the container by your front steps for holiday visitors to enjoy day or night.

Increase color and motion with the help of heated birdbaths. Attract greater numbers and variety of birds by providing water year round.  Northern gardeners should consider heated birdbaths to insure water is available even during the coldest months. Further help the birds by adding a few stones or branches to the birdbath. This allows the birds to drink without getting wet; helping them to preserve their body heat.

Create your own homemade outdoor lights. Line pathways, accent plantings or dress up fence posts with ice globe luminaries.  Produce your own or purchase ready to make kits. Use colorful outdoor LED lights or tea candles to light up blocks or spheres of ice. You and your family will have fun creating these memorable nighttime accents.

Add some livable art. Hang a few colorful and unique birdhouses in your backyard. They provide color and whimsy to the winter garden and will be ready for your feathered friends to move in this spring.

Include a “gingerbread” house for the birds. Hang decorative birdseed houses from a shepherds crook or tree branch. Be sure to place it in an area where you and the birds can enjoy the decorative treat. Look for a sheltered, but open area where the birds can watch for predators while enjoying their winter feast.

Move your holiday tree outdoors. Place your cut tree in a snow bank, vacant spot in the garden or make it part of your bird feeding station. The tree provides some extra greenery in the often drab winter landscape as well as shelter for the visiting birds. Then add a few of those birdseed ornaments for added food and winter decoration.


Gardening expert, TV/radio host, author & columnist Melinda Myers has more than 30 years of horticulture experience and has written over 20 gardening books, including Can’t Miss Small Space Gardening. She hosts The Great Courses “How to Grow Anything” DVD series and the nationally syndicated Melinda’s Garden Moment segments. Myers is also a columnist and contributing editor for Birds & Blooms magazine. Myers’ web site, www.melindamyers.com, offers gardening videos and tips.


Classic “Cast Iron” Cornbread

Cast-Iron-300x225Source: americanfood

Corn bread just doesn’t taste, or feel, the same way made with any other method. The key is the oiled, preheated cast iron pan, which gives the finished bread that incredible crisp around the edges texture.

Yields: 6-8 wedges

Prep Time: 10 minutes

Cook Time: 20 minutes

Total Time: 30 minutes

Ingredients:

  • 2 tablespoons vegetable oil
  • 2 cups yellow cornmeal
  • 1/2 cup all-purpose flour
  • 1 teaspoon baking powder
  • 1 teaspoon salt
  • 2 cups buttermilk
  • 1 egg

Preparation:

Preheat oven to 450 degrees F.

Add the oil to a 10-inch cast iron skillet, and put it in the oven for 5 minutes to get the oil very hot. Combine all the dry ingredients together and mix very well. Whisk the egg and buttermilk until completely mixed. Add to the dry ingredients, and mix enough to form a batter. Be careful not to over-mix.

Remove the cast iron pan out from the oven, and pour the oil into batter and stir in. Pour the batter back into the cast iron skillet, bake for about 20 minutes. The top of the cornbread should be golden-brown, and the bread should be pulling away slightly from the sides of the pan. Let cool for 10 minutes before trying to cut and serve.

Time to plant! ’Tis the season for bulbs and shrubs

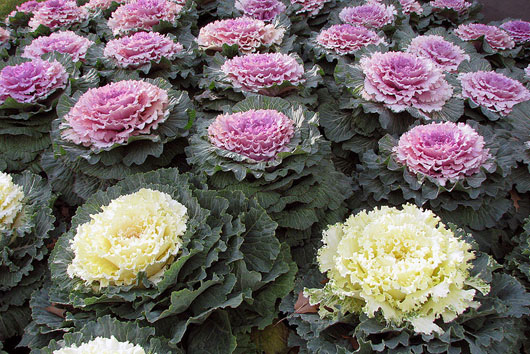
Ornamental kale, as edible as any other kind of kale, blooms all winter long. It is the cold that makes it take on its vivid coloring; ornamental kale is not as colorful in the warm months.Photo by Terren
Ornamental kale, as edible as any other kind of kale, blooms all winter long. It is the cold that makes it take on its vivid coloring; ornamental kale is not as colorful in the warm months.
Photo by Terren

By Polly Keary, Editor, The Monroe Monitor

With leaves off the trees and gardens dormant, it might not seem like the time to plant anything.

But nothing could be further from the truth.

An array of packets of bulbs fills a large display at Pine Creek Nursery. Now is the time to get bulbs in the ground for a colorful early spring garden.  Photo by Polly Keary

An array of packets of bulbs fills a large display at Pine Creek Nursery. Now is the time to get bulbs in the ground for a colorful early spring garden.
Photo by Polly Keary


In fact, to ensure a beautiful and healthy display in your yard next spring, or to keep your yard as lively as possible through the winter, head to local nurseries and pick up shrubs, trees and bulbs and get them in the ground.

“It’s the number one time to plant, because you are getting them in the ground where they get rained on all winter,” said Gwen Sayers at Pine Creek Nursery in Monroe, which has a wide variety of shrubs on the premises right now. “They don’t get stressed by heat, and they get all winter and spring to get established and get roots.”

Among the shrubs that are good to plant right now are evergreens, cypress, Japanese holly, juniper, cedar and weeping evergreens.

Also, flowering kale is actually at its brightest and most vivid in the winter months.

“Kale does great,” said Sayers. “It’s ornamental. They don’t grow a lot in spring and summer. They develop their color from the cold.”

Just because it’s winter doesn’t mean that you can’t have container gardens. In fact, they can do a lot to liven up patios and corners in the colder months.

“That’s something we love to do is do planters with evergreen and things like kale,” said Sayers. “A lot of that stuff will go into the summer, because it’s perennial.”

In the summer, you can plant annual flowers around a central perennial, and the perennial will still be there through the winter.

Another plant that is nice in winter container gardens, as it’s not hardy enough to be in the ground through a cold winter, is lemon cypress, a bright green-gold shrub that forms into low bushes.

Also right now is the time to plant your bulbs for early spring displays.

Garden stores everywhere are stocked up on tulips, crocus, hyacinth, daffodils and other bulbs right now, and perusing the colorful aisles planning next year’s garden-scape can be a lot of fun on a rainy afternoon.

For Our Feathered Friends: Homemade Suet and Backyard Winterizing

winterbirdBy Darla Antoine, ICTMN

From crows and robins to woodpeckers and cardinals. Not every bird flies south for the winter. Depending on where you are, you could be enjoying the company of a number of species that choose to tough out the winters. Why not make it a little easier on them by providing a few bird feeders in your backyard? Not only will it be easier for the birds to find food in freezing temperatures, but their colorful little wings will also brighten up your backyard.

During the colder months food can be scarce for birds. Berries are gone, insects are dead or dormant, and other food sources may be hard to come by. As can protection from freezing winds and the dark cold of winter nights.

To stay warm birds try to conserve their energy by flying as little as possible. They also puff up their feathers to create air pockets of insulation that help keep them warm. To keep their metabolism at a normal rate they need to compensate for the expended energy needed to keep warm by eating rich, nutrient-dense foods. Basically they need to get as many calories in as they can with as little effort as possible. Though birdseed may be enough in the summer it’s a good idea to offer your feathered friends suet in the winter.

Suet comes in little hard cakes and contains animal fat, seeds, nuts, grains and dried fruits. Though you can buy it just about anywhere, it is surprisingly simple and economical to make, especially if your family is doing any hunting this fall and you have access to some animal fat, otherwise bacon grease or beef trimmings from the butcher will work. Word on the street is that the birds prefer the homemade version themselves too.

Homemade Suet

2 cups quick-cooking  oats
2 cups cornmeal
1 cup flour
½ cup sugar
1 cup lard
1 cup crunchy peanut butter

In a medium saucepan, melt the lard and peanut butter over medium high heat, stirring occasionally.

In a separate bowl combine the oats, cornmeal, flour and sugar.

Add the dry ingredients to the melted fats.

Store the suet in a reusable container and scoop it out as needed. It’s recommended that you break up the suet into small chunks so that the squirrels can’t take too much at once.

Use a store-bought suet feeder to feed the birds or spread the suet directly on tree limbs.

And don’t forget to also offer the birds a little bit of warm water to drink and a few birdhouses or evergreen bushes to find sanctuary from the cold winds. With just a little bit of effort you can make the winter a lot more bearable for our feathered friends.

Darla Antoine on a recent visit to Washington State (Courtesy Darla)


Darla Antoine is an enrolled member of the Okanagan Indian Band in British Columbia and grew up in Eastern Washington State. For three years, she worked as a newspaper reporter in the Midwest, reporting on issues relevant to the Native and Hispanic communities, and most recently served as a producer for Native America Calling. In 2011, she moved to Costa Rica, where she currently lives with her husband and their infant son. She lives on an organic and sustainable farm in the “cloud forest”—the highlands of Costa Rica, 9,000 feet above sea level. Due to the high elevation, the conditions for farming and gardening are similar to that of the Pacific Northwest—cold and rainy for most of the year with a short growing season. Antoine has an herb garden, green house, a bee hive, cows, a goat, and two trout ponds stocked with hundreds of rainbow trout.


Read more at http://indiancountrytodaymedianetwork.com/2013/11/17/our-feathered-friends-homemade-suet-and-backyard-winterizing-152296

A healthy frybread option

Staff enjoyed a morning treat of warm frybread.Photo by Brandy N. Monteuil
Staff enjoyed a morning treat of warm whole wheat frybread.
Photo by Brandi N. Monteuil

By Monica Brown, Tulalip News Writer

TULALIP, Wash.-There’s something about frybread, maybe it’s that you can smell it a mile away and that scent brings back so many memories. This recipe was received as a request to test and it was surprisingly good. Since it contains mostly whole wheat flour it offers more filling fiber, which also helps to lower the net carbs of this tasty snack. The recipe indicates that it will make eight small frybread but I was able to make just over ten.

Since it is important to having slightly fluffy frybread, be sure that your baking powder is fresh. Test it by placing a tsp. into a small cup of warm or hot water, if it bubbles up immediately then it is still fresh. If not you will either need to buy more or make your own by combining, 1 tsp baking soda, 2 tsps cream of tartar and 1 tsp of corn starch (optional). Baking soda can be tested for freshness in the same manner but by placing a tsp in a small amount of vinegar.

This recipe can be found at www.diabetes.ihs.gov in the printed materials section. If you have a recipe that you would like to share please send it in to mbrown@tulaliptribes-nsn.gov. Recipe adapted from What’s cooking, Healthy in Warm Springs, Sara Lee Thomas, MS, RD and Edison Yazzie

Whole wheat Frybread

Ingredients:

2 cups whole wheat flour

1 cup white flour

3 tablespoons powdered milk

1 tablespoon baking powder

1 teaspoon salt (optional)

1 ½ cups warm water

Canola oil

Preparation:

Mix dry ingredients in a bowl and gradually add water to make dough. Knead the dough until it forms a ball and comes clean from the edge of bowl. Cover with a cloth and let sit for 30 minutes.

Pour about ¾ inch of canola oil into a deep frying pan and heat on medium. Test the temperature of the oil by putting a small pinch of dough into it. If the oil is ready, the will rise immediately to the top.

Divide the dough and knead into 8 round balls. Pat and stretch or roll dough out into flat circles until the dough is ¼ to ½ inch thick. With a fork, poke a few holes in the flattened circles of dough.

Carefully slide a flattened dough round into the hot oil to avoid splashes. Slightly lift frybread to check the bottom, when it is begins to brown turn it over. When both sides are done remove from oil, drain excess oil and place on baking sheet lined with paper towels.

Nutrition Information Makes 8 frybread

240 calories, 10g Total fat, 1g Saturated fat, 220-510mg Sodium, 35g Carbohydrate, 4g fiber, 6g Protein

whole wheat frybread with homemade jam.Photo by Brandi N. Montreuil
whole wheat frybread with homemade jam.
Photo by Brandi N. Montreuil

Protect your Winter Landscape from Hungry Wildlife

Fencing for animal protection

By gardening expert Melinda Myers

There’s no doubt that managing critters in the landscape can be a challenge especially as food supplies start to dwindle. If you are battling with rabbits, deer, groundhogs or other wildlife, don’t let down your guard as the growing season begins to wind down.

Be proactive. Start before they get into the habit of dining on your landscape. It is easier to keep them away than break the dining habit.

Fence them out. Fencing is the best defense against most wildlife.  A four feet tall fence around a small garden will keep out rabbits.  Secure the bottom tight to the ground or bury it several inches to prevent rabbits and voles from crawling underneath.  Or fold the bottom of the fence outward, making sure it’s tight to the ground. Animals tend not to crawl under when the bottom skirt faces away from the garden

Go deeper, at least 12 to 18 inches, if you are trying to discourage woodchucks. And make sure the gate is secure. Many hungry animals have found their way into the garden through openings around and under the gate.

A five foot fence around small garden areas can help safeguard your plantings against hungry deer. Some gardeners report success surrounding their garden with fishing line mounted on posts at one and three foot heights.

Break out the repellents. Homemade and commercial repellents can be used.  Apply before the animals start feeding and reapply as directed. Consider using a natural product like Messina’s Animal Stopper (www.Messinas.com). It is made of herbs, safe to use and smells good.

Scare ‘em away. Blow up owls, clanging pans, rubber snakes, slivers of deodorant soap, handfuls of human hair and noise makers are scare tactics that have been used by gardeners for years. Consider your environment when selecting a tactic. Urban animals are used to the sound and smell of people.  Alternate scare tactics for more effective control.  The animals won’t be afraid of a snake that hasn’t moved in weeks.

Combine tactics. Use a mix of fencing, scare tactics and repellents.  Keep monitoring for damage. If there are enough animals and they are hungry, they will eat just about anything.

Don’t forget about nature.  Welcome hawks and fox into your landscape. Using less pesticides and tolerating some critters, their food source, will encourage them to visit your yard. These natural pest controllers help keep the garden-munching critters under control.

And most importantly, don’t give up.  A bit of persistence, variety and adaptability is the key to success.  Investing some time now will not only deter existing critters from dining in your landscape, but will also reduce the risk of animals moving in next season.

Gardening expert, TV/radio host, author & columnist Melinda Myers has more than 30 years of horticulture experience and has written over 20 gardening books, including Can’t Miss Small Space Gardening. She hosts The Great Courses “How to Grow Anything” DVD series and the nationally syndicated Melinda’s Garden Moment segments. Myers is also a columnist and contributing editor for Birds & Blooms magazine. Myers’ web site, www.melindamyers.com, offers gardening videos, podcasts, and garden tips. 

Fall recipe: Pumpkin chocolate chip cookies

Pumpkin-chocolate-chip-cookies_monica-Brown
photo by Brandi Montreuil

By  Monica Brown, Tulalip News Writer

TULALIP, Wa. – I’ve tested two other recipes and this was by far the better and easier one. This recipe is from chef-in-training.com and I added more spices to give the cookies more of a pumpkin pie taste. The cookies are soft and have a pumpkin taste that isn’t overwhelming. I would suggest using at least cinnamon and nutmeg; the clove, ginger and allspice are optional.

I made the mistake of using pumpkin pie filling the first time, please don’t try that. Pumpkin pie filling has added spices, sodium, and sugar which make it delicious for pie but incompatible for cookies.  Use either homemade or canned pumpkin puree; if you can’t tell from the label that it contains only pumpkin look at the ingredients on the back and it should list pumpkin only.

Some may be thinking, why shortening, why not butter? Since the recipe calls for pumpkin this adds quite a bit of extra water and in order to remove the excess moisture the cookies need to be baked longer at a higher temperature which butter just can’t do. There are other recipes that call for butter but they produce soggy cookies and if you cook them any longer or at a higher temp they will burn. You can use butter instead of shortening but to avoid the excess moisture try adding oatmeal, or pre-boil the pumpkin and cool before adding. Also, do not just add more flour and hope it will counteract the moisture; this will make little puff balls that will be dense and cake like.


Wet ingredients:

1 cup shortening or buttered flavored shortening

1 cup white sugar

1 cup pumpkin puree (about ¾ of a 15oz can)

1 egg

Dry ingredients:

2 cups flour

1 tsp baking soda

1 tsp salt

1 tsp gound cinnamon

¼ tsp ground nutmeg

¼ tsp ground clove optional

A pinch each of ground ginger and ground allspice optional

And  1 -2 cups milk chocolate chips as desired

Preparation:

In a medium bowl, measure and sift together dry ingredients, this step is meant to equally distribute the spices.

In a large bowl mix together shortening, sugar and pumpkin, after blended add egg and mix well. Slowly add in the dry mix, once combined stir in chocolate chips.

On a nonstick, greased or parchment lined cookie sheet drop spoonful’s of cookie dough, spaced about 2 inches apart. Bake at 375 for 10-12 minutes. Cool cookies on wire rack and store in a ventilated container since they still contain a lot of moisture. Makes about 48 cookies.

Original recipe on www.chef-in-training.com